Saturday, February 19, 2022

SharePoint Workflows Inventory Report using PowerShell

  #For SharePoint 2007 Compatibility

[void][System.Reflection.Assembly]::LoadWithPartialName("Microsoft.SharePoint")


Function global:Get-SPWebApplication($WebAppURL)

{

 return [Microsoft.SharePoint.Administration.SPWebApplication]::Lookup($WebAppURL)

}


#Function to Get the workflow inventory for the entire web application

function Get-WorkflowInventory([string] $WebAppURL)

{

    #Get the Web Application URL

    $WebApp = Get-SPWebApplication $WebAppURL 


    #Iterate through each site collection

    foreach ($Site in $WebApp.Sites)

          {                             

                #Loop through each site    

                foreach ($Web in $Site.AllWebs)

                   {

                    #Loop through each list

                    foreach ($List in $Web.Lists)

                      {

                         # Leave hidden Lists and Libraries

                         if($List.Hidden -eq $false)

                         {

                            foreach ($WorkflowAssociation in $List.WorkflowAssociations)

                            {

                                #Leave the "Previous Versions"

                                if($WorkflowAssociation.Name.Contains("Previous Version") -eq $false)

                                    {

                                       $data = @{

                                        "Site" = $Site.Rootweb.Title

                                        "Web" = $Web.Title

                                        "Web URL" = $Web.Url

                                        "List Name" = $List.Title

                                        "List URL" =  $Web.Url+"/"+$List.RootFolder.Url

                                        "Workflow Name" = $WorkflowAssociation.Name

                                        "Running Instances" = $WorkflowAssociation.RunningInstances

                                        }


                                        #Create an object

                                        New-Object PSObject -Property $data

                                    }

                              }

                          }                   

                    }

                     $Web.Dispose()                 

                }

                $Site.Dispose()                  

    }

}


#call the function

Get-WorkflowInventory  "http://domain/"  | Export-Csv -NoTypeInformation -Path c:\Reports\WorkflowInventory.csv


write-host "Workflows Inventory report has been generated successfully!"


Write-Host " === === === === === Completed! === === === === === === == "  

Monday, August 26, 2013

Install Active Directory management tools on Windows 7 & Windows 8


The Remote Server Administration Tools (RSAT) for Windows 7 & 8 can be downloaded from Microsoft's web site:

For Windows 7 :
http://www.microsoft.com/downloads/details.aspx?displaylang=en&FamilyID=7d2f6ad7-656b-4313-a005-4e344e43997d

For Windows 8 :

http://www.microsoft.com/en-us/download/details.aspx?id=28972

After downloading and installing the tool on your Windows 7 computer, use the Turn Windows features on or off function to enable AD management tools.

1) From the Control Panel, click on Programs.
2) Under Programs and Features, select Turn Windows features on or off.
3) Under Remote Server Administration Tools > Role Administration Tools, select AD DS and AD       LDS Tools.

Creating a A-Z filter for a list


My customer wanted to have a library list, for adding books.
We had a title field for the book and some other meta data for each book.
He wanted to have a page where users could filter the list to view all books starting with A,B,C...Z
Something that will look like:
A,B,C,D,E,F,G,H,...Z
And a list grid below that will filter all books starting with the selected letter.
I found a rather easy solution for that that needed no code at all - only customization!
Basically what I did was:
1 - Add a calculated column that will hold only the first letter of the Title field.
(fomula for this: =LEFT(Title,1) )
2 - Then I added the list grid web part.
3 - To add filter support I added above a rich text web part and added the HTML for A,B,C...Z and made each letter a hyperlink to the same page with adding "?FilterBook=A".
4 - Now, all i had to do is to add a query string filter web part (comes with SharePoint) and configure it to take the filter value from "FilterBook" query string and send it to filter the list grid web part below.
Done!
No code solution that took no more than 10 minutes!
Customer happy, me happy :)

Wednesday, August 21, 2013

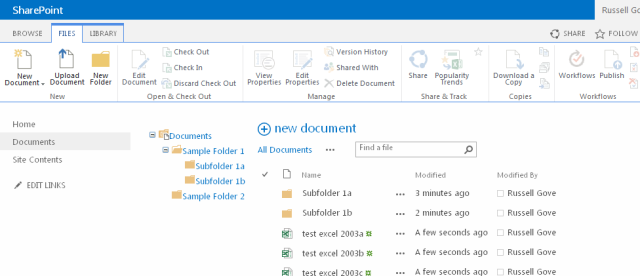
Treeview for a document library using sharepoint designer


Steps:
To add a treeview to a document library view, folow these steps:
1. Broswe to the view you want to add the treeview to.
2. Edit the page in Sharepoint Designer — then click Advanced Mode.
3. Add a table to PlaceHolderMain with one row and two columns (if you cut and paste this, make sure all the double-quotes get paster properly!):

<table style=”width: 100%”>
   <tr valign=”top”>
    <td width=”20%”>
    </td>
    <td>
    </td>
   </tr>
</table>
4. Move the existing Webpart Zone (the one that contains the view) and all its content to the second <td> you just added.
5. Add the following to the first <td>  you just added(the one whose width is 20%). Again make sure all the double-quotes get paster properly!
<SharePoint:SPHierarchyDataSourceControl id=”doclibDataSource” runat=”server” RootListId=”ff460d94-a778-426e-988f-487c654550de”
RootWebId=”6bb72437-8077-4b8c-b2ee-bf389ab08273″ ShowFolderChildren=”true” EnableViewState=”false”>
</SharePoint:SPHierarchyDataSourceControl>
<SharePoint:SPTreeView ID=”doclibtreeview” runat=”server” DataSourceID=”doclibDataSource” EnableViewState=”false” ExpandDepth=”2″
SelectedNodeStyle-CssClass=”ms-tvselected”>
</SharePoint:SPTreeView>
6. Change the RootListId attribute of the SPHierarchyDataSourceControl to whatever is in the ListID Attribute of the  XsltListViewWebPart in the second <TD>.
7 .  Change the RootWebId attribute of the SPHierarchyDataSourceControl to the WebID of the Web the list is in (I used sharepoint manager to get the WebID)
8.Getting the webid using below script
<script type="text/javascript">
ExecuteOrDelayUntilScriptLoaded(PageLoad, "sp.js");
function PageLoad() {
debugger;
this.ctx = SP.ClientContext.get_current();
this.web = ctx.get_web();
this.ctx.load(this.web);
ctx.executeQueryAsync(Function.createDelegate(this, this.onQuerySucceeded), Function.createDelegate(this, this.onQueryFailed));
}
function onQuerySucceeded() {
debugger;
alert(this.web.get_id());
}
function onQueryFailed(sender, args) {
alert('Request failed. ' + args.get_message() + '\n' + args.get_stackTrace());
}
</script>

I have added this also to an office 365 account(although its tricky to get the web id). Here’s how it looks there:
and in SharePoint 2013 on-prem:


jQuery Autocomplete in an C# Environment with Database

first example:

ASPX - uses codebehind

<script src="js/jquery-1.8.3.js" type="text/javascript"></script>
<script type="text/javascript" src="js/jquery-ui-1.9.2.custom.min.js"></script>
<link rel="stylesheet" type="text/css" href="css/jquery-ui.css" />
<script type="text/javascript">

$(function() {
var availableTags = [ <%= SuggestionList %> ];

$( "#<%= TextBox1.ClientID %>" ).autocomplete({
source: availableTags
});
});

</script>

page body

	<form id="form1" runat="server">
<div>
<div class="ui-widget">
<label for="TextBox1">
Tags:
</label>
<asp:TextBox ID="TextBox1" runat="server" />
</div>
</div>
</form>

ASPX codebehind

public string SuggestionList = "";

protected void Page_Load(object sender, EventArgs e) {

string queryString = "SELECT * FROM Customers ORDER BY CompanyName";

using (SqlConnection connection = new SqlConnection(ConfigurationManager.ConnectionStrings["NorthwindConnectionString"].ConnectionString)) {

using (SqlCommand command = new SqlCommand(queryString, connection)) {

connection.Open();

using (SqlDataReader reader = command.ExecuteReader()) {

while (reader.Read()) {

if (string.IsNullOrEmpty(SuggestionList)) {
SuggestionList += "\"" + reader["CompanyName"].ToString() + "\"";
} else {
SuggestionList += ", \"" + reader["CompanyName"].ToString() + "\"";
}

}
}
}
}

}

second example:

ASPX - uses webservice

	<script src="js/jquery-1.8.3.js" type="text/javascript"></script>
<script src="js/jquery-ui-1.9.2.custom.min.js" type="text/javascript"></script>
<link href="css/jquery-ui.css" rel="stylesheet" type="text/css" />
<asp:PlaceHolder runat="server" id="phSearchText">
<script type="text/javascript">
$(document).ready(function () {

SearchText();

function SearchText() {
$("#<%=TextBox1.ClientID %>").autocomplete({
source: function (request, response) {
$.ajax({
url: "EmployeeList.asmx/GetAutoCompleteData",
type: "POST",
dataType: "json",
contentType: "application/json; charset=utf-8",
data: "{ 'txt' : '" + $("#<%=TextBox1.ClientID %>").val() + "'}",
dataFilter: function (data) { return data; },
success: function (data) {
response($.map(data.d, function (item) {
return {
label: item,
value: item
}
}))
//debugger;
},
error: function (result) {
alert("Error");
}
});
},
minLength: 1,
delay: 1000
});
}
});
</script>
</asp:PlaceHolder>

page body

	<form id="form1" runat="server">
<div class="ui-widget">
<asp:TextBox ID="TextBox1" runat="server"></asp:TextBox>
</div>
</form>

WebService, this happens to use ADO.Net, but you could use pretty much anything as a valid query source

[WebService(Namespace = "http://tempuri.org/")]
[WebServiceBinding(ConformsTo = WsiProfiles.BasicProfile1_1)]
[System.ComponentModel.ToolboxItem(false)]
// To allow this Web Service to be called from script, using ASP.NET AJAX, uncomment the following line.
[System.Web.Script.Services.ScriptService]
public class EmployeeList : System.Web.Services.WebService
{

[WebMethod]
[ScriptMethod(ResponseFormat = ResponseFormat.Json)]
public List<string> GetAutoCompleteData(string txt)
{
// your code to query the database goes here
List<string> result = new List<string>();
string QueryString = System.Configuration.ConfigurationManager.ConnectionStrings["NorthwindConnectionString"].ToString();

using (SqlConnection obj_SqlConnection = new SqlConnection(QueryString))
{
using (SqlCommand obj_Sqlcommand = new SqlCommand("Select DISTINCT CompanyName as txt from Customers where CompanyName like @SearchText +'%' ", obj_SqlConnection))
{
obj_SqlConnection.Open();
obj_Sqlcommand.Parameters.AddWithValue("@SearchText", txt);
SqlDataReader obj_result = obj_Sqlcommand.ExecuteReader();
while (obj_result.Read())
{
result.Add(obj_result["txt"].ToString().TrimEnd());
}
}
}

return result;
}

}

Tuesday, August 6, 2013

Styling SharePoint Blog Comments


Better looking comment form

Better looking comment form

<style type="text/css">

.ms-commenttable td {border:0px;}

h4.ms-CommentTitle{border:0px; font:italic normal small Georgia;}

div.ms-CommentBody {

background:url('../../images/comm_top.gif') top 0px no-repeat;

margin-bottom:12px;

padding:18px 0 0 0;

}

div.ms-CommentBody div {

border:1px solid #ccc;

border-top:0px;

padding:15px;

line-height:18px;

}

.ms-CommentFooter {background:url('/_layouts/images/square.gif') 5px 50% no-repeat;

padding:3px;

margin:0px;

border-top:1px dotted #ccc;

border-bottom:1px dotted #ccc;

}

.ms-CommentFooter span {padding-left:18px;}

.ms-commentsWrapper {background:#fff; margin:5px; border:0px;}

.ms-blogedit a{ background:transparent; border:0px;}

.ms-blogedit a:hover{background:#ccc; border:0px;}

h3.ms-CommentHeader{padding-left:35px;

background:url('/_layouts/images/menunewdiscussion.gif') top left no-repeat}

.ms-formtable { border-top:1px dotted #ccc; border-bottom:1px dotted #cccpadding:5px;}

/* cell holding the labels */

.ms-formlabel { border:0px ;width:100px;}

/* label text */

.ms-formlabel h3.ms-standardheader{ padding-top:5px; font-weight:normal; text-align:right;}

/*wraps the form elements */

.ms-formbody {background:transparent;   border:0px;}

/* the title input field */

.ms-formbody span input{

background:#FEFFE2;

padding:2px 5px 1px 5px;

height:28px;

border:1px solid #ccc;

font:italic normal normal small/18px Arial;

margin:5px 0 5px 0;

}

/* text area for the comment body */

.ms-formbody span textarea{

font:italic normal normal small/18px Arial;

background:#FEFFE2;

padding:5px;

border:1px solid #ccc;

margin:0 0 5px 0;

}

/* submit button */

.ms-toolbar input.ms-ButtonHeightWidth2 {

height:26px;

border:2px solid #317A0C;

background:#51AA25;

color:#fff;

font:italic normal x-small Georgia;

}

</style>