My customer wanted to have a library list, for adding books.
We had a title field for the book and some other meta data for each book.
He wanted to have a page where users could filter the list to view all books starting with A,B,C...Z
Something that will look like:
A,B,C,D,E,F,G,H,...Z
And a list grid below that will filter all books starting with the selected letter.
I found a rather easy solution for that that needed no code at all - only customization!
Basically what I did was:
1 - Add a calculated column that will hold only the first letter of the Title field.
(fomula for this: =LEFT(Title,1) )
2 - Then I added the list grid web part.
3 - To add filter support I added above a rich text web part and added the HTML for A,B,C...Z and made each letter a hyperlink to the same page with adding "?FilterBook=A".
4 - Now, all i had to do is to add a query string filter web part (comes with SharePoint) and configure it to take the filter value from "FilterBook" query string and send it to filter the list grid web part below.
Done!
No code solution that took no more than 10 minutes!
Customer happy, me happy :)
Monday, August 26, 2013
Creating a A-Z filter for a list

Tuesday, August 6, 2013
Styling SharePoint Blog Comments

Better looking comment form
<style type="text/css">
.ms-commenttable td {border:0px;}
h4.ms-CommentTitle{border:0px; font:italic normal small Georgia;}
div.ms-CommentBody {
background:url('../../images/comm_top.gif') top 0px no-repeat;
margin-bottom:12px;
padding:18px 0 0 0;
}
div.ms-CommentBody div {
border:1px solid #ccc;
border-top:0px;
padding:15px;
line-height:18px;
}
.ms-CommentFooter {background:url('/_layouts/images/square.gif') 5px 50% no-repeat;
padding:3px;
margin:0px;
border-top:1px dotted #ccc;
border-bottom:1px dotted #ccc;
}
.ms-CommentFooter span {padding-left:18px;}
.ms-commentsWrapper {background:#fff; margin:5px; border:0px;}
.ms-blogedit a{ background:transparent; border:0px;}
.ms-blogedit a:hover{background:#ccc; border:0px;}
h3.ms-CommentHeader{padding-left:35px;
background:url('/_layouts/images/menunewdiscussion.gif') top left no-repeat}
.ms-formtable { border-top:1px dotted #ccc; border-bottom:1px dotted #ccc; padding:5px;}
/* cell holding the labels */
.ms-formlabel { border:0px ;width:100px;}
/* label text */
.ms-formlabel h3.ms-standardheader{ padding-top:5px; font-weight:normal; text-align:right;}
/*wraps the form elements */
.ms-formbody {background:transparent; border:0px;}
/* the title input field */
.ms-formbody span input{
background:#FEFFE2;
padding:2px 5px 1px 5px;
height:28px;
border:1px solid #ccc;
font:italic normal normal small/18px Arial;
margin:5px 0 5px 0;
}
/* text area for the comment body */
.ms-formbody span textarea{
font:italic normal normal small/18px Arial;
background:#FEFFE2;
padding:5px;
border:1px solid #ccc;
margin:0 0 5px 0;
}
/* submit button */
.ms-toolbar input.ms-ButtonHeightWidth2 {
height:26px;
border:2px solid #317A0C;
background:#51AA25;
color:#fff;
font:italic normal x-small Georgia;
}
</style>
Wednesday, July 24, 2013
Sharepoint 2010 List filtering by date range
1. Add new item for Task list

2. Go to Site Actions >> Edit Page

3. Add web part Date Filter

4. Edit Web part
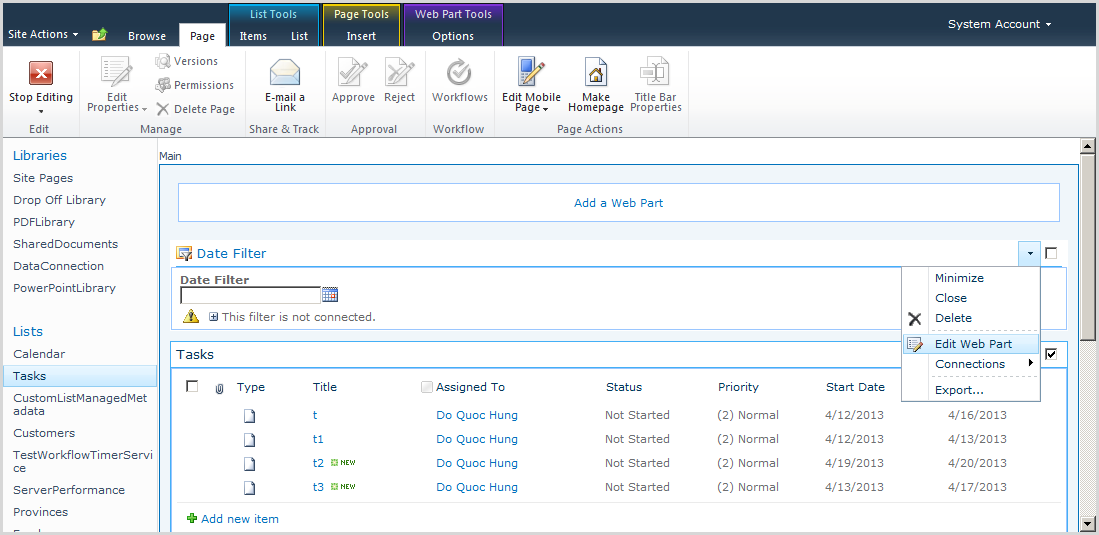
5. In the options pane that appears, change the Filter name to 'Start Date', and change the default value to 'offset from today 7 days: Before today'. Then click ok.

6. Underneath that, add another date filter and change its filter name to 'End date', and change the default value to 'offset from today: 0 days: After today'. Then click ok.

7. Now save the page in your browser, then open the page up in SharePoint designer (SPD) - in design view.

8. Edit page in Advanced Mode

9. Once opened in SPD, click on the list web part to select it, then in the ribbon click on the list view tools > options > parameters icon.

10. Add two new parameters, one called 'startdate'. Leave the parameter sources and default values as default.

11. Add two new parameters, called 'Enddate’. Leave the parameter sources and default values as default.

12. Click OK

13. Click on the start date filter and click add connection

14. In the dialog that pops up change the dropdown value to 'Send filter values to', click next.

15. Ensure that 'connect to a web part on this page' is selected in the next dialog and click next.

16. Change the target action in the next dialog to 'Get parameters from' and click next.

17. In the next dialog, select 'Start Date' from the first box, and 'Startdate' from the second box and click next. Then click finish.

18. Click Finish

19. Click on the End date filter and click add connection

20. In the dialog that pops up change the dropdown value to 'Send filter values to', click next.

21. Ensure that 'connect to a web part on this page' is selected in the next dialog and click next.

22. Change the target action in the next dialog to 'Get parameters from' and click next.

23. In the next dialog, select 'End Date' from the first box, and 'Enddate' from the second box and click next. Then click finish.

24. Click Finish

25. Now we have our date filters feeding the list with its values but we still have to set up the filter on the list. Click the list web part to select it, then in the ribbon click on the list view tools > options > filters icon.

26. The filter criteria box wills popup. First add a rule 'Start Date > Greater than or equal to > [Startdate]'.

27. Click to “Click here to …”

28. Then add another clause 'Start Date > Less than or equal to > [Enddate]'. Click ok.

29. Now save the page and open it back up in your browser. It will, by default, show all tasks Start Date in the last seven days thanks to the default setting of the start date filter. Changing these filters will filter the list according to the date ranges set.

30. You can write your caml query in sharepoint designer

Monday, July 15, 2013
To fix Note Board missing SharePoint 2010

To fix this You have to start the user profile service on Your SharePoint server and connect it to the web application where You added the web part. You can do this by going to Central administration -> Manage web applications -> select the proper web application -> click Service connections in the Ribbon -> Tick the checkbox next to the User Profile Application -> click OK.
If everything went good, You should now see a comment box below the Note Board header:

Using jQuery with Sharepoint 2010
1. Download jQuery
Download latest verion of jQuery here http://docs.jquery.com/Downloading_jQuery
2. Save it in an Accessible Location in Sharepoint
Using Sharepoint Designer I added a Folder called “Scripts” inside the “Style Library” of the root level of the site. I then added the latest jQuery File into that folder.

3. Place a reference on that jQuery from your code
The best place for this will be your master page so that it can be used anywhere in your site, so open the master page (by default SharePoint 2010 uses v4.master) you are using in Advanced mode then add your javascript reference like such.


<script src="/Style%20Library/Scripts/jquery-1.6.2.js" type="text/javascript"></script>
you place that inside the <head> tag

Save that master page and you are ready to go
4. Test if its working
If you are using FireFox open up firebug or if you are using IE you can press F12. Go to the script tab to check whether your javascript reference is there, then on the console window try wether that reference works by typing something like this.
$("#MSO_ContentTable").text("Welcome to Sharepoint jQuery")you should get a result something like this

Working With 2/3 level Cascading Dropdown In Sharepoint List
Sometimes we face such limitations or issues, requirements where we need to do some custom coding in sharepoint. obviously this hampers performance and consumes time in developing forms and testing it.
Simply, i wanted to create a list where i need to implement cascading Dropdowns. most of us are familiar with such scenarios like Country, State, District dropdown are filled up one by one depending on selection of previous dropdownlist. For such simple requirement we may need to invest time in custom code and testing.
Below image can give a better idea about given scenario.

Here i wanted to create a list of category, sub-categories and Store. my store list includes look up for category and sub-category which i need to fill-up on the basis of selection of fist dropdown value. lets see how it works. i will try to guide through images as we all know that we hate reading and require faster output.
List Structure:
1. Created a list Category.(List Name:Category)
Image:1

2.Created Sub-Category List (List Name:SubCategory)
Image:2

In this list, I have look-up column 'RequestCategory' for 'Title' in 'Category' list.
3.Created a list where we expect to select cascading dropdown while adding or editing a item into list(List Name:Store).
Image:3

In this case if you observe add, edit form. it will bring all items from 'SubCategory' (2nd list) and not only in which we are interested in by selecting Item from 'Category' (1st List).
Solution:
To resolve this problem we need following (.js) files.
1.jquery click here for latest version
2.jquery.SPServices click here for latest version
add content editor webpart where you want to make cascading dropdown work.
put below script into content editor webpart:
<script language="javascript" src="/sites/Home/Requisition/Shared%20Documents/jquery-1.9.0.js" type="text/javascript"></script>
<script language="javascript" src="/sites/Home/Requisition/Shared%20Documents/jquery.SPServices-0.7.2.js" type="text/javascript"></script>
<script language="javascript" type="text/javascript">
ExecuteOrDelayUntilScriptLoaded(loadCascadingDDL, "sp.js");
function loadCascadingDDL()
{
$().SPServices.SPCascadeDropdowns({
relationshipList: "SubCategory",
relationshipListParentColumn: "RequestCategory",
relationshipListChildColumn: "Title",
parentColumn: "ItemCategory",
childColumn: "ItemSubCategory",
});
}
</script>
Here in above example parameters are below:
relationshipList: is the list name of 2nd image.(SubCategory list)
relationshipListParentColumn:Parent column from 2nd image(parent look-up column in SubCategory List)
relationshipListChildColumn:The child field name which you want to display on second dropdown(from SubCategory List/ 2nd image)
parentColumn:The field name which you want to treat as a parent column(from list where you want to input data/3rd image)
childColumn:The field name which you want to treat as a child column(from list where you want to input data/3rd image)
all this works for add/Edit item as well and we don't require any custom coding.
Output:

Note: it can fail or will not respond, if you do have space,-,(,) characters in your field name.
Going ahead question may raise in your mind that is it possible to create three level cascading dropdowns? i'll say, why not?
In this case we will repeat same function for next cascading dropdwon.
Three level cascading dropdownlist:
I created a new list 'Request' where i need to refer all above lookups with this list. below is screeenshot for list.

and my output should be:

And my code would be:
<script language="javascript" src="/sites/Home/Requisition/Shared%20Documents/jquery-1.9.0.js" type="text/javascript"></script>
<script language="javascript" src="/sites/Home/Requisition/Shared%20Documents/jquery.SPServices-0.7.2.js" type="text/javascript"></script>
<script language="javascript" type="text/javascript">
ExecuteOrDelayUntilScriptLoaded(loadCascadingDDL, "sp.js");
function loadCascadingDDL()
{
$().SPServices.SPCascadeDropdowns({
relationshipList: "SubCategory",
relationshipListParentColumn: "RequestCategory",
relationshipListChildColumn: "Title",
parentColumn: "ItemCategory",
childColumn: "ItemSubCategory",
});
$().SPServices.SPCascadeDropdowns({
relationshipList: "Store",
relationshipListParentColumn: "ItemSubCategory",
relationshipListChildColumn: "Title",
parentColumn: "ItemSubCategory",
childColumn: "Request",
});
}
</script>